|
Foot Bath Detox
is a self-contained high-tech machine water detoxification system that
enables the body to heal itself. It is very user friendly and
requires no special training to perform. It is a detox water foot bath
which uses brass and stainless steel electrodes. It is used as a foot
bath to cleanse, balance and enhance the bio-energy (the vital energy
force present in the breath of bodily fluids). This energy is the
electro-magnetic force that is stored within the body and utilized by
our cells. The complex energy fields permeate and realign the
body's energy field while improving oxygen levels. While the foot
bath is widely used to increase energy (both physical and mental
energy), vitality, and stamina, at the same time, it purges
(detoxifies) the body of toxins, chemicals, radiation, pollution,
synthetics, and other foreign material trapped in the skin layers that
have clogged up the body's systems of elimination. Its internal
cleansing includes parasite cleansing and liver detoxification, which
results in less body fluid retention, reduced inflammation, improved
memory, greater bladder control, a more balanced pH, a stronger immune
system and significant pain relief, including headaches, gout and
arthritis pain.
As
believed in Reflexology, each foot is actually a channel, a conduit,
through which your body attempts to cleanse itself of toxic wastes and
heavy metals that are building up in many parts of your body. During
the foot bath, you will actually see the cleansing process take place
as the water interacts with a compound electric current and magnetic
field structure. This body cleansing process results in the
correct frequency required for cells to return to a healthy state, and
to release waste that has been bonded to them over the years.
This detoxification therapeutic procedure also enhances the effects of
other therapies. This unit is among the best detox products
available.
|
Color
changes
that might help you better understand what is happening:
When the water becomes
excited it ejects these tiny
particles, and they become visually observable in the water.
This will
tend to
make the water look dirty brown. Of course, just how dirty the water
becomes is
related to how much sediment is in
the actual water. When you test a
bucket of
water to see this principle (with no body parts in the water), how
dirty it
actually becomes
will generally be the same each time you use a new
bucket of
water from the same source. If you were to run this test over and
over
again
but with a different person's feet in the water each time, what happens
to the
water can be amazingly different. Sometimes the water will be more
dirty,
and
sometimes cleaner. Without taking the individual whose feet are
in the
water
into account; the whole color change seems completely random. But of
course it
is not. Only after a lot of observation you begin to see what you
already
knew right from the start. It is the health of the person that plays
the vital
role in conjunction with the water. Let's say you are using
the same quality water for each Foot Bath treatment
so we can
understand what's
happening in the water a little easier. The quality of the water we use
also
contains a little sediment so when
we test it in a bucket it turns brown
as
opposed to light brown or dark brown; so it's about midway in browns
when it
comes to color change.
If you were performing Foot Bath treatments, it
is
always a good thing to test a bucket of water to see what color it may
go as a
reference
to help understand the color after a treatment.
Because everybody's ability to
absorb energy is different, the reaction of the
water is also going to be different. Remember, good health - better
energy
ability, poor health - not so good energy-wise. It is this factor that
the
water reacts to. Don't forget that the water is also wanting to keep
some energy
for itself, it desires energy just as much as you do. This means the
energy
created by the water is going to have to be shared by both you and the
water.
If you are in reasonable shape you're going to be able to get your fair
share
of energy, but if you're not so good you're
only going to be able to
absorb the
amount your body can handle with the rest being kept by the
water. The water can then use this
energy to dislodge the sediment and clean itself. So people with poor
health
tend to have a water color after treatment that would be a dark brown.
We also
notice that if the person continued with the Foot Bath treatment that
the water
would become a lighter color as treatments progressed.
On the other
hand, if we
treat a healthy person with the Foot Bath treatment, the water may only
change
to a very light brown because the healthy person can absorb their fair
share of
the energy produced by the water. In the end it comes down to a
balancing act
between the water and the person, taking into account how much energy
the
person can absorb and how much energy the water needs to dislodge its
impurities.
Of course, this is a simple explanation of the energy
exchange. It
can get a little more complicated because it also depends on how
much
energy
your water quality can produce, it depends on whether your body battery
is damaged
or just low.
All these factors affect what happens during the
treatment.
NOTE: While the color changes
in the water can be dramatic, it is not the most
important factor and one must be careful about making any judgments
based only
on the water color. Some waters do not change color and it is not
always an
indicator of whether energy is being produced.
The best indicator that may be
found in the water after a treatment would be an oily substance located
on the
container at water level. It generally contains materials released from
the
outer layers of the skin. Another indicator after treatment can be
found in the
color change in the urine of the individual treated. Body function is
increased
which results in the darker coloring of the urine. A darker coloring of
urine
can also be seen after eating because the body is processing waste materials. After a
treatment even though no food has been
consumed the extra energy seems to activate waste product or toxin
removal
evident by it presence in the urine.
Many different colors and
objects may appear in the water during a treatment:
yellow-green, orange, brown, black, dark green, white foam, white
cheese like
particles, black flecks, red flecks, bubbles of differing colors, brown
particles.
Foot
Bath Color Chart
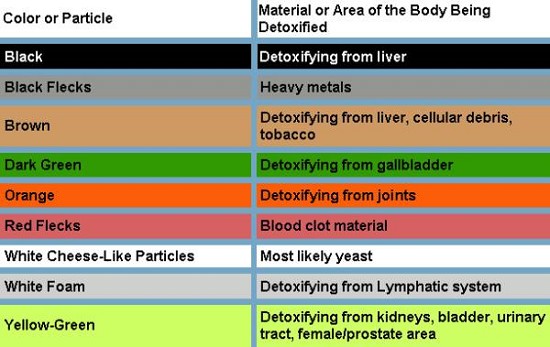
White foam
indicates
mucous from lymph.
White cheese like particles indicates probable
yeast.
Black flecks indicate heavy metals.
Red flecks indicate blood
clot material.
What
is
the significance of each color?
Believe it or not,
it is important to eat a variety of colorful foods in order to assure
balanced chemistry. Every color is a chemical and has a chemical
value. Chemical components of foods contribute to their
acid-alkaline balance. As a general rule, Green Foods nourish the
immune system, especially the liver and gall bladder. Red Foods
nourish the endocrine system, including the pituitary gland, as well as
the heart and small intestines. Orange Foods nourish the joints.
Yellow Foods nourish the digestive system, including the spleen,
stomach, and pancreas. Yellow-green foods nourish the kidney, bladder,
urinary tract, female/prostate area. Brown Foods nourish the
liver. White Foods nourish the respiratory system, namely the
lungs, but also the large intestines, lymphatic system and skin.
Black Foods nourish the circulatory system, kidneys, liver, gallbladder
and bladder.
So, when
the water is changing colors, each color represents the part of the
body that is being detoxified. One of the most visual effects is the
discoloration of the water, but while the color changes in the water
can be dramatic, it is not the most important factor and one must be
careful about making any judgment's based only on the water color.
Some people claim that what
you see in the water are toxins being drawn right out of your body, but
most of what you see happening with the water is related directly to
the water being used. You can easily test this for yourself, if you
have the opportunity to run the Aqua Chi in a container of water, with
no body parts in the water. You will probably see a pretty dramatic
color change take place - although some waters do not change color,
(even with feet in the water). The person using the water does
influence what the water will look like as well, so that even using the
same water source, the way the water looks can vary greatly among
individuals.
The Foot Bath is energy
medicine, and I believe that we see the most benefit and detox AFTER a
session – not necessarily during a foot bath. When the body is better
balanced and charged, the body will be better able to detoxify through
its regular channels of detoxification. (such as the kidneys, colon,
liver).
Water, salt and the metal in
the unit interact with each other to produce ions. These ions will
neutralize everything they come in contact with including toxins that
are in tap and filtered water. Depending on geographical location,
approximately 20-40% of what you see in the water comes from the junk
in the water, and the remaining 60-80% comes from the client's body.
The degree of detoxification will be reflected in symptomatic
improvement, not water color change. Some waters do not change color
[this has to do with the geographical region] and it is not always an
indicator of whether energy is being produced. In some geographical
regions, water may even change color without any body parts present in
the water. The water color change without body parts has to do
with the combination of industrial and chemical pollutants common to
those areas.
Water has an almost perfect balance of
positive and negative ions. Since the body is composed of about
70% water, its ability to interact with water is very high. When
you immerse a body mass into water, the vibrational frequency of the
water will affect the vibrational frequency of the body due to the
interaction of the magnetic and electrical fields. Consequently,
the Detox Foot Bath unit is one of the best
detox products. It is an exceptionally wonderful and natural
healing tool. It is painless, with no drugs, and no harmful side
effects.
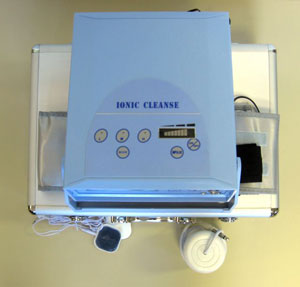
The Operating Instructions!
Ionic
Foot Bath Detox
Single Use
Step 1:
If you
have received free radical test
kits with your system purchase, follow the instructions with the kit to
gauge
the level of free radical activity in your body prior to doing your
first foot
Detox. Wait until at least two Detox sessions have been completed
before
retesting. A decrease in free radicals (destructive molecules) in the
body is
the one of the best indicators that your ionic foot Detox is helping
you get
healthier.
Step
2:
Wear
shorts or clothes that will not
dip into the foot tub.
Step 3:
Bring the
following items to a relaxing
place near a power outlet:
- Foot bath system and
accessories
- Comfortable chair
- It may be most
convenient to place the foot bath unit on a coffee table or other low
table off to the side to make it easier to read and reach for the foot
bath controls.
- Liners to cover the
basins and save on cleaning time (white plastic kitchen garbage bags
work).
- Find plastic washbasins
or containers large enough to fit two feet and an array and fill it 4-5
inches (10-13 centimeters) deep with warm water. Some use a pet
litter container. Your feet and the array will be completely
submersed. Warm water is not only more comfortable and relaxing,
but also opens up skin pores which improves the ionic Detox
diffusion/osmosis process. It also dissolves the salt faster
which makes adjusting the amperage easier.
- A towel for drying off
- Non iodized table salt
(Non iodized sea salt produces more color in the water, but is not any
more effective at producing ions than regular non iodized salt and
requires more to be added)
- Wrist strap gel
(included with system purchase)
Step 4:
Look at
the rear of the foot bath
unit. There is a switch that toggles between 110/115 volts and
220/230
volts. Some countries such as the U.S. and Canada run on
120 volt, 60 cycles per second (60 hertz), and most of the
world runs on 220/230 volt, 50 cycles per second (50 hertz). If
the
switch is not in the right position for your country, then use a lever
such as
a small flat headed screwdriver to flip the switch.
Step
5:
Position
the foot bath unit support by
grabbing where the support connects to the unit on both sides and pull
outward
and away from the unit. This allows the support to rotate into
the
upright position.
Step
6:
Plug the
power cord into the power
outlet and the rear of the foot bath system.
Step 7:
If the
Far Infrared Ray belt is to be
used, decide where to place it. The actual bamboo charcoal inside
the
yellow corduroy material is usually placed over the waist, but may also
be used
on a leg, arm, shoulder or back. Warning! – Do not use it near
the
heart. Also, it should not be placed vertically along the spine,
but may
go across the spine. It may be used directly on the skin or over
the
clothes. Wrap the FIR belt around the body using the hook and
loop
fasteners to secure it in place. The extra black hook and loop
fastener
may be added to lengthen the belt so that it will go around the waist
of larger
users. Plug the FIR belt into the hole in the rear of the unit
that has
the black ring around it.
Step
8:
Electrical
stimulation
is a completely separate function from the ionic
Detox. E-stim
does not have to be used at all during a Detox session. If e-stim
stimulation is to be used during the session, then connect the white
patches to
the metal leads attached to the white electrical cord, Then plug
the
other end of the white cord into the connector at the front lower right
of the
unit where it says “IMPULSE”. Place the patches on muscles of the
body to
relieve pain or clear up the skin. The current passes from one
patch
through to the other. As the patches are placed closer together,
the
e-stim intensity between the patches increases. Do not place them
on the
chest or near the heart. In order for e-stim to work, both
patches must
be used. After each use, the patches should be put into water and
then
dried so that when they are used again, they will stick well to the
skin.
Step 9:
Plug the
array into the front right of
the foot bath system where it says “ARRAY” and place it in the
water.
Make sure that the water level is at least ¼ inch above the top
of the array.
Step 10:
Flip the
power switch in the rear of
the foot bath unit so that the “1” is depressed instead of the
“0”. After
you flip the switch, the display will light up and you will hear the
fan turn
on.
Step 11:
Decide
which wrist to put the wrist
strap on and remove any metal watch or jewelry from that area.
Open the
wrist band clamp. Place the wrist band around the wrist.
Place a
small amount of wrist strap gel on the rectangular metal wrist strap
electrode. Then pull the band tight so that the metal
electrode
contacts the inside of the wrist and close the wrist band clamp.
It is
very important that the wrist band electrode remain in close contact
with the
skin. If you take the wrist band off during the session, the
timer will
stop and then resume again after you put the wrist band on again.
Plug
the wrist strap into the hole in front bottom right of the unit that
says
“WRISTBAND”.
Step
12:
Place
feet in the water. The foot
bath system will not operate without the feet.
Step
13:
If the
FIR belt or electrical
stimulation is to be used, press the On/Off button on top of the
unit.
This will cause the “L” to light up red. This means that the FIR
belt is
set to the low intensity. Press the “MODE” button to change
between low,
medium and high intensity.
Step
14:
Also, the
electrical stimulation
display will be lit with one green bar after the On/Off button from the
last
step has been pressed. This means that e-stim is set to the
lowest
intensity. Press the “IMPULSE” button to change between four
different intensity levels which, which are low (one green bar),
medium
(two green bars), high (three green and two orange bars) and highest
(three
green, two orange and two red bars).
Step
15:
Most
Detox sessions last 30
minutes. If a different length is needed, then the
and
buttons
may be used to change the “TIME” to anywhere between 1 and 60
minutes. The length of time remaining in the session may also be
changed
in the middle of the session.
Step
15:
Change
the mode to mode 1 by pressing
the “MODE” button until MODE 1 appears on the display (the default is
mode 3).
·
Mode 1
provides 70% positive electrode polarity and 30% negative
electrode polarity which provides 70% negative ionization and 30%
positive
ionization throughout the session. The overall effect is to raise
blood
pH from acidic toward alkaline. Since most people have a body pH
which is
too acidic, this is the mode that should be used in most
situations. One
way to measure pH is by using saliva pH test strips.
·
Mode 2
provides 30% positive electrode polarity and 70% negative
electrode polarity which provides 30% negative ionization and 70%
positive
ionization. This could be used for the rare person that has a
body pH
that is too alkaline.
·
Mode 3
provides 50% positive electrode polarity and 50% negative
electrode polarity which provides equal negative ionization and
positive
ionization. This could be used for a person that is already at
the ideal
neutral pH level. This might happen after undergoing ionic Detox
for a
period of time until neutral pH is reached.
·
Mode 4
provides positive electrode polarity (negative ionization)
only. It is not normally used except in specific clinical test
settings
because it may be too powerful and provide excess negative ions.
This
mode also wears out the arrays faster.
·
Mode 5
provides negative electrode polarity only. It is not
normally used.
Step
16:
Press the
“START” button to begin the
Detox session. Values for voltage and amperage will appear.
Step
17:
Add a
tiny amount of salt (1/8 teaspoon
or 1/2 milliliter or the amount that can be pinched between a thumb and
forefinger) away from where the array is and move your feet around a
little to
dissolve the salt. The ion density in the water has differences
because
of regional water quality. Do not add too much
salt.
If you do, the alarm will sound and the unit will not work. (If
the
alarm sounds even when you add no salt, this is commonly caused by high
salt
content in the tap water. Try using different water.)
Step
18:
Aim for
amperage A of 1.3 to 1.7.
If the A stays lower, then add a very small amount of salt such as 1/16
teaspoon or ¼ milliliter at a time and monitor the A for a
minute. If the
A reaches higher, then the alarm will sound to indicate that A is too
high. More water will need to be added to the foot tub. If
the foot
tub is already full of water and no more can be added, then start over
again by
repeating the previous steps.
Troubleshooting
If
the
amperage remains at 0, then do the following:
1) Make sure
the feet
are in the water.
2) Make sure
there is
no jewelry near the wrist strap.
3) Make sure
the wrist
strap is adjusted fairly tightly around the wrist.
4)
If
the
previous measures don’t help, the problem
could be the connection of the wrist strap to the machine. Try
using a
small screwdriver or razor blade to adjust the metal strips of the
wrist strap
plug to make the plug wider.
Arrays
The coils
in these arrays are made of
304 grade stainless steel. Most arrays from other companies are
made of
200 series steel which is much more corrosive because it consists of
15% carbon
(304 steel is 8% carbon). Therefore, the arrays will not last as long
(although
the cheaper steel will show more color change in the water). The
arrays
included with this system should last at least 80 sessions if proper
cleaning
methods are used. If the arrays are used for more than 100
sessions, then
a lot more salt needs to be added in order to get the amperage in the
right
range. To care for the arrays while reducing stains and keeping
them
clean and disinfected, follow this procedure:
1) Rinse the
arrays
with warm water immediately after the session ends.
2) Clean the
outside
plastic of the arrays using a dish washing sponge with dish soap.
3) Rinse of
the arrays
with warm water again.
4) Immerse
the arrays
in a solution of CLR with water for approximately 15 minutes. CLR
is an
environmentally friendly cleaner in a gray plastic container that is
found at
most grocery, discount or hardware stores.
5)
Immerse
the
arrays
in a solution of 20 parts water and one part white vinegar and leave
them
immersed until the next use.
|